

 Likes:


Most shops still sell off the shelf desktop PC's. so nothing is stopping you from getting one, however these are normally not the most powerful systems and aimed at the lower end of the market. Online and high street specialist shops do offer more powerful systems that you can buy, this obviously has some advantages, as you are not responsible for the actual assembly and the warranty will be on the complete system, not just the parts. The biggest disadvantage in these cases is that there will always have to be a compromise, and the configuration might not be what you had in mind.

Building your own will ensure you get exactly what you want.
Changes
The above reasons are enough for us to explain how to build your own desktop PC. There have been quite a few changes in the market since our last desktop workshop in 2011, that was the year of the Sandy Bridge and Sandy Bridge-E processors, the second generation core architecture. In 2014 Intel introduced the Haswell and Haswell-E processors, which are the fourth generation. AMD had their Phenom processors, which have long been succeeded by the FX and A processors. SSD drives were expensive in 2011, now you can get a 512GB drive for the same price as you could get a 120/128GB model then. The largest capacity hard disk was 3TB, you can get 6 TB drives now and 8TB drives will not be far off.
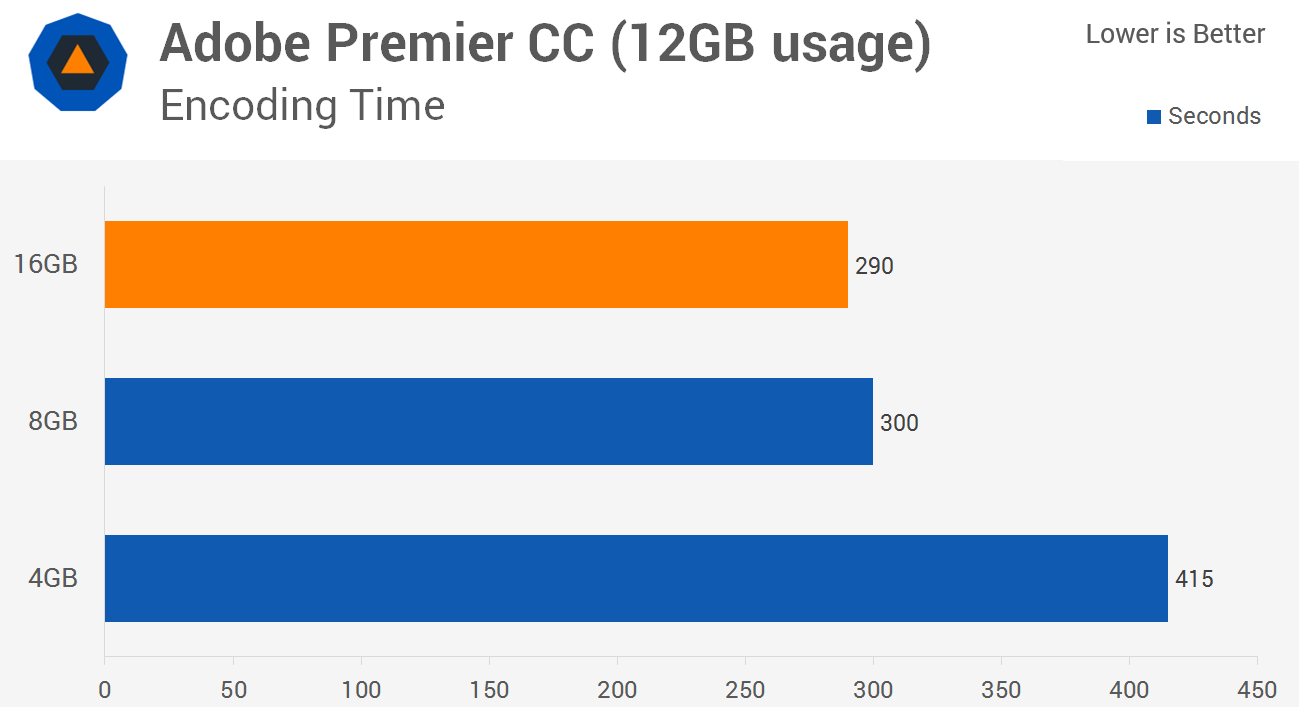
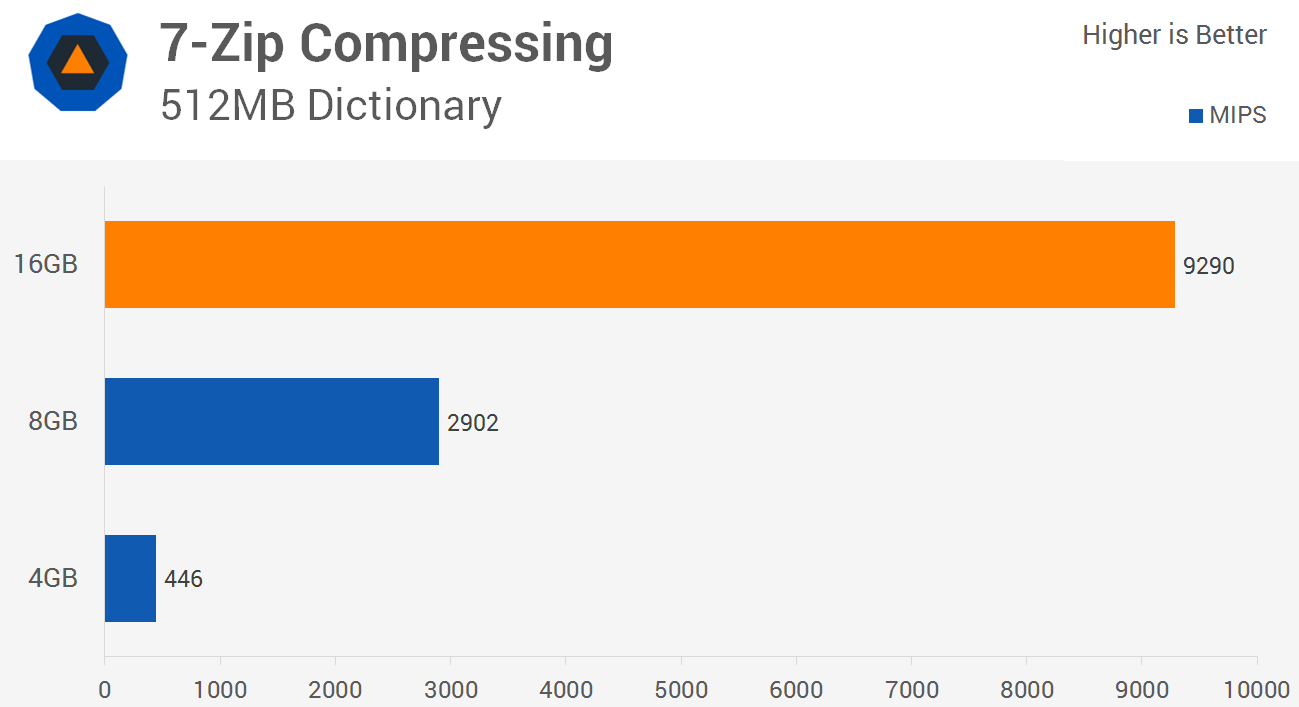
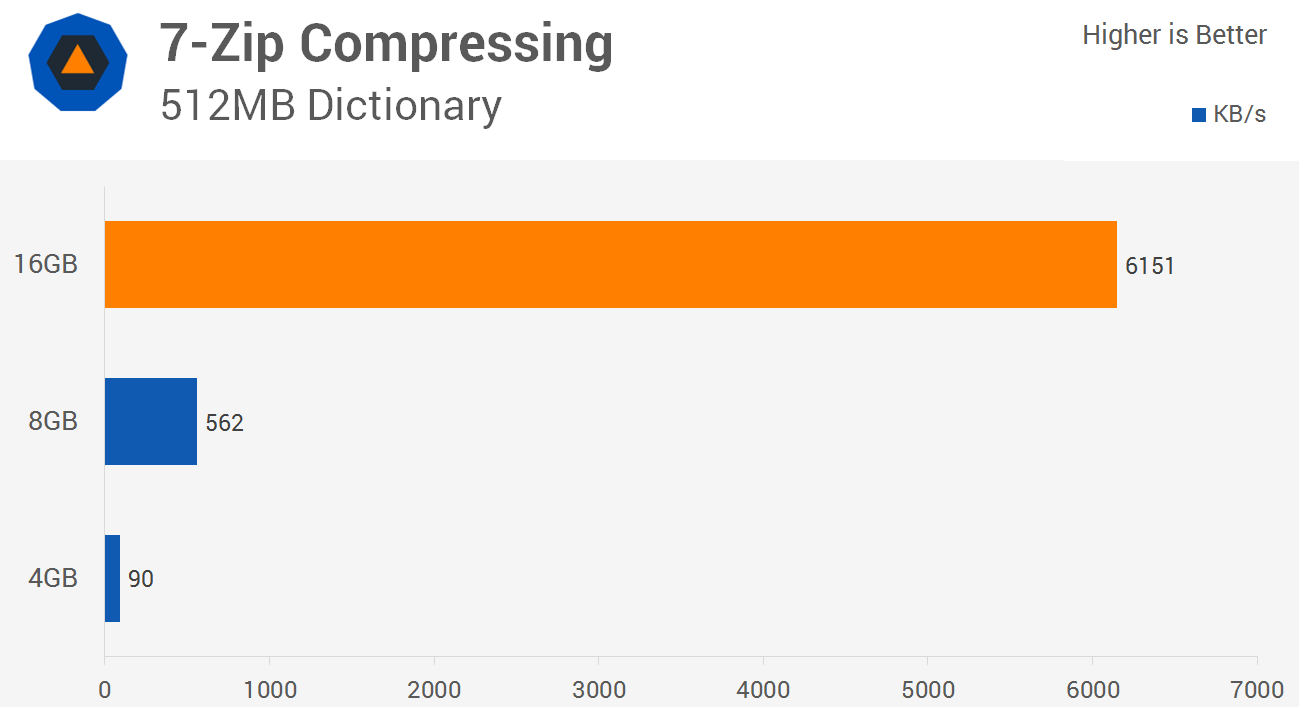
When we check the user polls we regularly have on the site most users were working with 4GB of memory back then, with 8GB becoming more popular. Currently most users (42%) have 8Gb and 16GB is not uncommon as 26% of users have that in their systems.
Graphics cards have changed as well, be it less than what you would expect. In 2011 AMD introduced the Radeon HD 7970, based on the then very new Graphics Core Next architecture. The first PCI-Express 3.0 GPU, the first supporting DirectX 11.1 and the first built on a 28nm process. nVidia followed shortly after with its GTX 680, based on the Kepler architecture and with similar features. More than 3 years on and we have to conclude that these products have not really moved on, they are named differently and are priced differently but both manufacturers still use the same production processes and architectures, and the API and interfaces have not been changed. PCI-Express 3.0 is now the current standard, and we might see big changes in the graphics market in this year, but we doubt that this will happen.
Looking at cases and power supplies we have seen some refinements. Cases are evolving and features that you would only see on the more expensive models in 2011 are now more or less standard in every case. Of course there are still enough exotic and luxurious models available, and we are using one of these in this workshop. Power supplies have evolved as well, the 80Plus god standard is quite common and the 80Plus Titanium standard is coming soon. Optical drives are quickly becoming a thing of the past, this workshop will most likely be the last where we actually use one.
We will also pay some attention to peripheral equipment, as without a keyboard, mouse and monitor your brand new PC will not be much use other than gathering dust. To actually work with one requires some more items.
Preperation: parts
Preparation and planning is winning half the battle. Firstly you will have to ensure all parts are actually in your house before you can start your build. The components below should be the standard in every PC:
- Processor
- CPU cooler + thermal paste
- Motherboard
- memory
- Graphics card
- Hard disk and/or SSD
- Optical drive
- Case
- Optional case fans
- power supply
A few points of consideration on the above shopping list. Every CPU normally will have a cooler supplied with it, but a third party one is normally not only better in cooling the processor, it is usually also a lot quieter. Our latest test proves that beyond any reasonable doubt.
Thermal paste between cooler and CPU is necessary to ensure the best transfer of heat from the processor. 9 out of 10 CPU coolers will come with a small tube of this, or there is already a layer of paste applied to the base of the heatsink. Proper thermal paste can make a big difference in your CPU temperature, it is always worth investing a few extra pounds in the right kind.
If you opt for a motherboard and processor combination with an integrated graphics card it is not a necessity to get a dedicated graphics card. The power supply is in a lot of desktop cases already included, as are case fans. Check if these items are actually included in your case of choice, if not, buy them separately.
Finally, the parts we use in this workshop are by no means a guide for an ideal configuration. We have our PC Advice section if you are looking for the best setup tailored to your specific needs. This workshop only covers the assembly of the different parts in to a working desktop PC.

Next to your list of parts you will also need some tools and other items to build your PC, a decent philips head screwdriver is one of them. Do not worry about the correct screws as these will all be supplied with your case, but it is always useful to have some cable ties around you for cable management in the case. Also the internal cables you need to connect all different parts together are either supplied with the case itself or with the motherboard, so no need to look at these separately unless you want a specific colour or length.
It is also advisable to make sure that you have enough space around you when you start building your PC, we prefer a large, empty table or desk. When you actually start working on the parts and start screwing them into the case ensure make surethere is no static electricity. Touch an unpainted metal surface or wear an anti-static wristband when you work inside the case.

The case you choose determines how easy placing the parts in it will be. A large case is usually easier to work with as there is more space, but keep in mind that very large case will require longer cables. We opted for the very user friendly Corsair Graphite 760T Black. This full-ATX case can also take larger motherboards and has enough space for future upgrades should you require these.


The best time to place the processor and the memory on the motherboard is before you actually put this into the case. Access to the socket etc is easier when the board is not in the actual case itself, the same applies to the processor cooler, assemble and place this on the board before you place the motherboard in the case. if you are going to use watercooling this will have to be placed on the socket later when the system is (part) assembled.
For this workshop we opted for a high end model Intel processor, the unlocked Core i7 4790K, sporting 4 cores and HyperThreading, 4GHz CPU frequency and a turbo that can go to 4,4 GHz.
Intel stopped using pins on their processors years ago, and moved them onto the socket. This means that you have to secure the processor into the socket with a clamp. Release the lever on next to the socket so that it points upward to open the clamp, lift the metal bit from the socket and take out the plastic protector that is in the socket.
Next step is to carefully place the processor in to the socket, we say careful as the pins on the socket are quite fragile and can break easily under too much pressure. The processor has notches on both sides and only fits one way in to the socket, just line it up so the notches are level with the socket and place the processor without force. Push back the metal clamp and push it under the security pin, push the lever down and secure it, the processor is placed and will not move anywhere.
AMD processor still have the pins on the processor and not in the socket. These processor are placed by releasing the lever next to the socket, place the processor into the socket the right way. As with Intel processors the CPU will only fit one way into the socket and the correct way is indicated by a little arrow on both the processor and the socket. Once the processor is placed in the socket just push the lever back down and secure it.


http://uk.hardware.info/reviews/5843...er-preperation


 Responder com Citação


Bookmarks